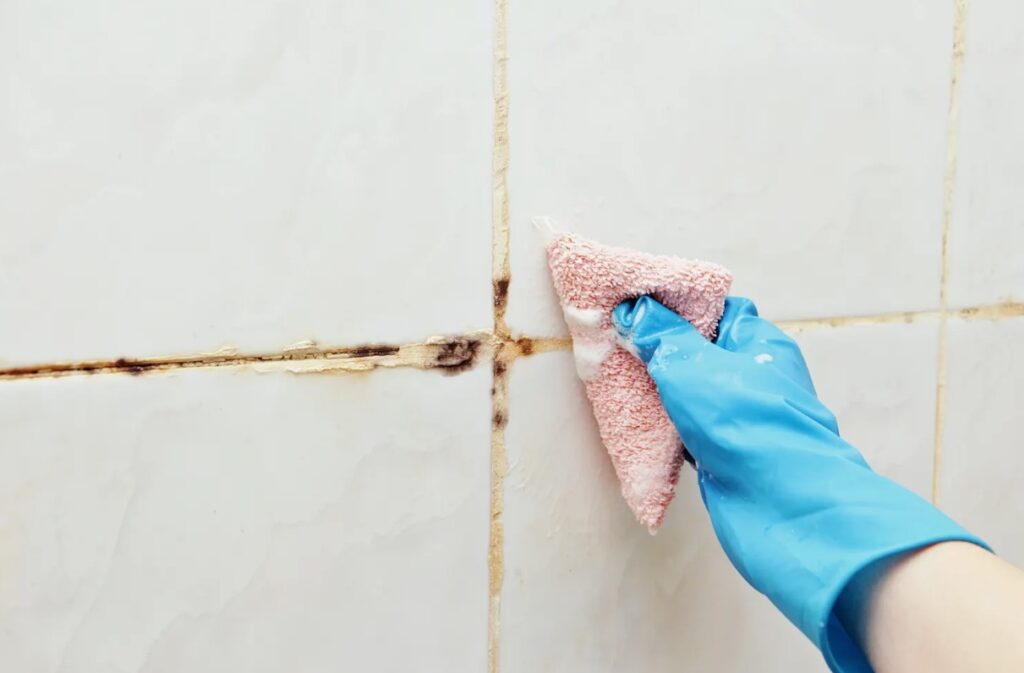
Mold creeping into your grout lines is not just unsightly—it can pose health risks, damage surfaces, and even spread if left unchecked. Luckily, the good news is that removing mold from grout is very manageable with the right methods and tools. Whether you’re tackling grout in your bathroom, kitchen, or any tiled area, this guide will walk you through the most effective steps to eliminate mold and keep it at bay.
You’ll learn why mold grows in grout, DIY cleaning techniques, professional-grade solutions, and steps to prevent mold from returning. Let’s tackle the problem head-on!
Why Does Mold Grow in Grout?
Before jumping into the solutions, it’s helpful to understand why mold loves grout so much. Grout is a porous material, which means it absorbs moisture easily, creating a breeding ground for mold when combined with warmth and lack of ventilation. Common places for mold growth include:
- Bathrooms: Constant exposure to hot water and steam creates a moist atmosphere.
- Kitchens: Spilled water, grease, and lack of regular cleaning can encourage mold.
- Laundry Areas: Wet surfaces and high humidity make this another hotspot.
By understanding what causes mold, you’ll have a better grasp of the changes you need to make to prevent future outbreaks.
How to Get Rid of Mold in Grout
Here are step-by-step instructions to effectively remove mold from grout. You’ll find both DIY solutions and professional-grade methods to tackle any level of mold infestation.
1. Start with Basic Cleaning Tools
Before using stronger solutions, start with basic tools and determine the extent of the mold growth. You’ll need:
- A stiff-bristled brush (grout brush or old toothbrush will work)
- Warm water
- Dish soap
Steps:
- Dip the brush in warm, soapy water.
- Gently scrub the grout lines, focusing on visibly moldy areas.
- Rinse with clean water and dry thoroughly with a clean cloth.
This initial cleaning might be enough for light mold. If stubborn patches remain, proceed with stronger cleaning agents.
2. Use Natural Cleaners (Like Vinegar and Baking Soda)
For small to moderate mold growth, natural home remedies can work wonders without introducing harsh chemicals.
White Vinegar:
- Pour undiluted white vinegar into a spray bottle.
- Spray generously onto the affected grout.
- Leave it to sit for 15–20 minutes, then scrub with a stiff brush.
- Rinse with warm water and dry thoroughly.
Baking Soda Paste:
- Mix baking soda with a small amount of water to create a thick paste.
- Spread the paste over moldy grout lines using a sponge or an old toothbrush.
- Scrub using a stiff brush, paying special attention to tough spots.
- Rinse thoroughly and pat dry.
Both methods are natural, eco-friendly alternatives that are safe for grout and tiles.
3. Try Hydrogen Peroxide for Deep Cleaning
Hydrogen peroxide is a powerful antibacterial and antifungal solution, ideal for tougher mold infestations.
Steps:
- Pour hydrogen peroxide into a spray bottle or directly onto the grout.
- Allow it to soak for 10–15 minutes.
- Scrub the grout lines with a brush to break up any mold colonies.
- Rinse with water and dry completely.
Hydrogen peroxide’s bubbling action helps lift mold from grout surfaces and penetrate porous areas for deeper cleaning.
4. Use Commercial Mold Cleaners
For more challenging cases of mold infestation, commercial mold cleaners are highly effective. Look for products specifically designed for tile and grout, such as Tilex or ZEP Mold Stain Remover. Always follow the instructions provided by the manufacturer.
Things to Keep in Mind:
- Wear gloves and ensure proper ventilation when working with chemical cleaners.
- Never mix cleaning products like bleach and ammonia—this can create dangerous fumes.
5. Fight Mold with Bleach (For Persistent Cases)
Bleach is one of the most effective solutions for heavy mold buildup or stains in light-colored grout. However, it should be used sparingly as it can wear down grout over time.
Steps:
- Mix 1 part bleach with 3 parts water in a spray bottle.
- Spray directly onto the affected areas.
- Allow it to sit for 10–15 minutes.
- Scrub the area with a grout brush and rinse thoroughly with water.
Cautionary note: Bleach can discolor some tiles, so always perform a spot test first!
6. Consider Regrouting Severely Affected Areas
If mold has deeply penetrated the grout or if the grout is crumbling, cleaning may no longer suffice. Regrouting may be necessary to solve the issue entirely.
Regrouting Process:
- Scrape away old grout using a grout removal tool.
- Apply new grout using a grout float, making sure to seal it properly once it dries.
Consider working with a professional to ensure this process is done correctly.
Keeping Grout Mold-Free
Once you’ve successfully removed mold, the key is to prevent it from coming back. Here’s how:
Improve Ventilation
Poor airflow is one of the major causes of mold growth in areas like bathrooms. Use exhaust fans or open windows during and after showers.
Dry Surfaces Regularly
Mold thrives in damp environments. Use a squeegee or towel to dry tiles and grout after washing or showering.
Apply a Grout Sealer
Sealing grout lines creates a protective barrier that repels moisture and inhibits mold growth. Reapply every 6–12 months for maximum effectiveness.
Clean Regularly
Use mild cleaning agents like vinegar or dish soap during regular cleaning to keep mold at bay. Address spills and moisture quickly to eliminate breeding grounds for mold.
When to Seek Professional Help
For severe mold infestations, consider bringing in professionals. They can assess underlying causes (e.g., water leaks or structural issues) and apply advanced treatments to restore your grout and tiles.
Final Thoughts on Mold-Free Grout
Getting rid of mold in grout takes effort, but the results are well worth it. Whether you tackle the issue with household solutions, commercial cleaners, or professional help, there’s a solution for every homeowner.
By maintaining cleanliness, improving ventilation, and sealing grout, you can significantly reduce the chances of mold making a comeback. Start your cleaning project today and enjoy sparkling, mold-free grout that enhances the beauty of your home.